How to Fix a Chip on Granite Countertop Edge at Home?

Time:2026-06-07 Author:Aria
0%

When a chip appears on the edge of your granite countertop, it can be disheartening. Jenna Collins, a granite restoration expert, once said, “Repairing a chip quickly can save your countertop from further damage.” Understanding how to repair a chip in a granite countertop edge is crucial for maintaining the beauty and functionality of your kitchen or bathroom.

Granite is a durable material, yet it is not invincible. Everyday wear and tear can lead to unfortunate chips. These minor damages, if left alone, can lead to larger cracks. Addressing these chips promptly restores both aesthetics and integrity.

Many homeowners worry about the complexity of repairs. However, repairing a chip doesn't have to be daunting. With the right tools and techniques, it can often be a straightforward task. Taking the time to learn how to repair a chip in a granite countertop edge not only enhances your skills but also empowers you to take care of your home. Each repair presents an opportunity for learning and improving, paving the way for a more polished living space.

How to Fix a Chip on Granite Countertop Edge at Home?

Gather Necessary Tools and Materials for Repairing Granite Chip

Repairing a chip on your granite countertop can seem daunting, but gathering the right tools and materials makes it manageable. Start by collecting epoxy filler suited for granite. This material is crucial for repairing the chip effectively. A putty knife can help spread the filler smoothly. You will also need fine sandpaper, a damp rag, and a sealant to protect the surface afterward.

It's important to have a steady hand during this process. As you apply the epoxy filler, make sure to push it into the chip thoroughly. This allows for a seamless repair. Use the putty knife to scrape away excess filler. Working with a damp rag can prevent the filler from sticking to unintended areas.

Tips: Clean the area well before starting. Dust and debris can hinder the repair process. Once the filler is dry, gently sand it down until it's flush with the countertop. Remember, perfection isn't the goal. Each chip tells a story. Embrace the uniqueness of your countertop, even with its flaws.

Repairing Chips on Granite Countertops

Identify the Damage and Assess the Extent of the Chip

Assessing the extent of a chip on your granite countertop edge is the first step in fixing it. Begin by examining the chip carefully. Is it small or large? Is the underlying stone exposed? If only a small piece is missing, it may not affect the countertop’s structural integrity. According to a report from the Natural Stone Institute, granite can chip due to heavy impacts, with some impact-resistant options available.

Understanding the type of damage helps in determining the repair method. If the damage is severe, you might need professional assistance. However, many small chips can easily be repaired at home. To assess effectively, use a magnifying glass to inspect the edges closely for additional cracks. This thorough approach ensures you don't overlook hidden damage, which may worsen over time.

**Tip:** Clean the area surrounding the chip thoroughly. Use a gentle cleaner to remove dust and debris. This allows a better inspection and a smoother repair process.

**Tip:** Document your findings with pictures. Take clear photos of the chip from different angles. This documentation creates a reference for future repairs and helps you decide on the necessary steps.

Granite is a durable material, but it requires proper care. Repairing small chips promptly can prevent further complications. Stay aware, and regularly check your counters for signs of wear and tear.

Prepare the Granite Surface for Repair

Preparing the granite surface for repair is a crucial step in fixing a chip on your countertop. Begin by thoroughly cleaning the area with a mild detergent. This eliminates dust, grease, and other debris that can hinder the adhesion of repair materials. According to industry reports, proper surface preparation can increase the effectiveness of the repair by over 75%.

Next, assess the damage closely. Determine the size and depth of the chip. If the chip is deep, you might need to slightly sand the edges around it. Use fine-grit sandpaper to create a smooth transition to the unaffected area. A study by the Natural Stone Institute found that properly prepped surfaces result in longer-lasting repairs.

Ensure the surface is completely dry before applying any repair compound. Moisture can prevent the bonding agents from setting correctly. It's important to be patient during this stage. Rushing can lead to visible errors. Think through your next steps carefully. A thoughtful approach here can lead to a more seamless finish when you do proceed with the repair.

Apply Epoxy or Filler to the Chip and Smooth It Out

Chipping on a granite countertop can be frustrating. Fortunately, you can fix it at home using epoxy or filler. The right materials are crucial for a successful repair. Start by cleaning the chipped area thoroughly. Remove any dust or debris to ensure a strong bond. Once the surface is clean, you can assess the size and depth of the chip.

When selecting epoxy or filler, look for options designed specifically for granite. Follow the manufacturer's instructions for mixing the product. Be prepared to work quickly, as many fillers have a short curing time. Apply the mixture carefully into the chip, making sure to overfill slightly. This allows for smoothing later. You might need to practice patience here; achieving a perfect fill is challenging.

After the epoxy cures, use a fine grit sandpaper to smooth the area. Gently sand until the surface is even and level with the countertop. It might take several attempts to get it just right. Take your time and check your work frequently. Remember, the goal is to blend the repair with the surrounding stone. Flaws may still be visible, but that’s part of the charm of DIY repairs. Every imperfection tells a story, and it’s okay for the repair to show its character.

Polish and Finalize the Repaired Area for a Seamless Finish

Polishing the repaired area on a granite countertop is essential for achieving a seamless finish. Granite’s polish creates a glossy surface, enhancing its natural beauty. According to industry experts, a well-polished granite countertop can increase its longevity and resistance to stains and chipping.

To polish the area, begin with a diamond polishing pad, preferably in the range of 200 to 300 grit. It’s crucial to maintain consistent pressure and speed. Limit water usage to avoid damage, but don’t skip it entirely. Water helps to reduce friction and allows the pad to glide smoothly over the surface. Some users report that over-polishing can lead to a hazy finish, indicating the need for careful observation and technique refinement.

After initial polishing, transition to a finer grit pad, around 1,000. This step refines the repair, giving it a glass-like appearance. Frequent checks and slight adjustments during the process are vital. Experts emphasize the importance of patience. Rushing risks an uneven finish, which is often more noticeable than a chip. Thus, allowing time for multiple polishing passes is a best practice for a professional look.

FAQS

: What tools do I need for repairing granite chips?

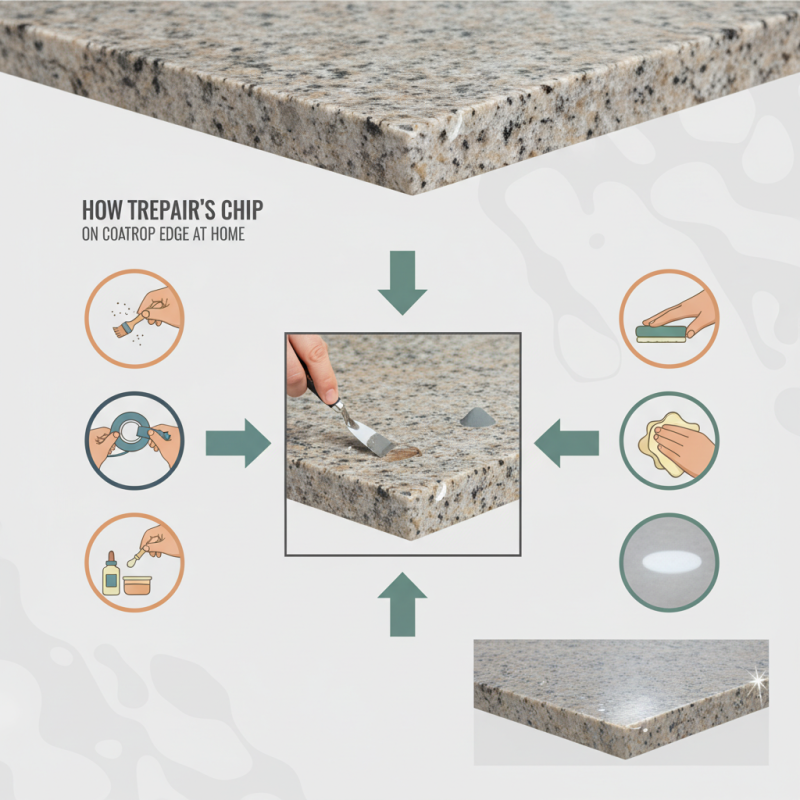
: You will need epoxy filler, a putty knife, fine sandpaper, a damp rag, and a sealant.

How do I assess the damage before repairing?

Examine the chip's size and depth. Use a magnifying glass for hidden cracks.

Can all granite chips be repaired at home?

Many small chips can be fixed at home. Severe damage might require professional help.

What is the best way to apply the epoxy filler?

Clean the area well, then apply the filler carefully. Overfill it slightly for easier smoothing.

How can I ensure a smooth surface after filling the chip?

Use fine grit sandpaper to smooth the area once the filler cures. Check frequently for evenness.

Is perfection required in DIY granite repairs?

Perfection isn’t the goal. Embrace your countertops' uniqueness and the stories each chip tells.

How can cleaning affect the repair process?

A clean surface helps create a strong bond for the epoxy. Dust and debris can hinder your efforts.

Should I document the damage before repair?

Yes, taking pictures helps track the chip's condition and guides future repairs.

What should I do if the chip reveals the underlying stone?

Assess whether it affects structural integrity. Small chips may be repaired, while large ones may need experts.

Can I still see flaws after the repair?

Yes, visible flaws are common. Each imperfection adds character to your DIY repair.

Conclusion

To address the question of how to repair a chip in a granite countertop edge, it is essential to begin by gathering all the necessary tools and materials for the repair process. Once equipped, evaluate the damage to determine the size and depth of the chip, as this will influence the repair method. Preparing the granite surface properly is crucial for a successful fix; clean the area thoroughly to ensure that the epoxy or filler adheres well.

After preparation, the next step is to apply the epoxy or filler directly into the chip, carefully smoothing it out to match the surrounding area. Finally, polish the repaired section to achieve a seamless finish that blends with the rest of the countertop. Following these steps will help restore your granite countertop edge effectively and maintain its aesthetic appeal.

Aria

Aria

Aria is a dedicated marketing professional with a deep passion for innovative strategies and a keen understanding of our company's product offerings. With a wealth of experience in the industry, Aria excels at crafting engaging content that highlights the unique features and benefits of our......