What Is the Best Way to Waterproof Stone in a Steam Shower? The answer begins beneath the stone, not on its polished surface. Stone sealers can reduce staining, but they do not create a reliable waterproof or vapor-proof assembly. A steam shower needs a continuous waterproofing system, carefully treated seams, sloped surfaces, and sealed penetrations around valves, benches, and lights.
Michael Byrne, a respected tile educator and author, is often associated with this essential warning: “Tile is not waterproof.” The same principle applies to natural stone. Water and vapor can travel behind beautiful marble, especially through grout joints and tiny construction gaps. A compatible sheet or liquid membrane should cover the walls, ceiling, floor, niches, and transitions. In a steam enclosure, the ceiling also needs proper slope and detailing. Small details matter.
The best method depends on the complete system.
Choose products designed to work together. Follow the manufacturer’s instructions. Do not mix membranes, sealants, and drains casually. That shortcut may look harmless. It can create hidden weaknesses.
Experienced installers usually inspect corners, fasteners, benches, and pipe penetrations before setting stone. Flood testing can reveal leaks, but it may not prove vapor resistance. This is where many projects become uncertain. A stone surface can appear dry while moisture slowly damages the structure behind it. Proper planning, documented installation steps, and qualified workmanship provide stronger protection than any topical sealer alone. The goal is not merely attractive stone. It is a durable steam-room envelope that controls water and vapor for years.
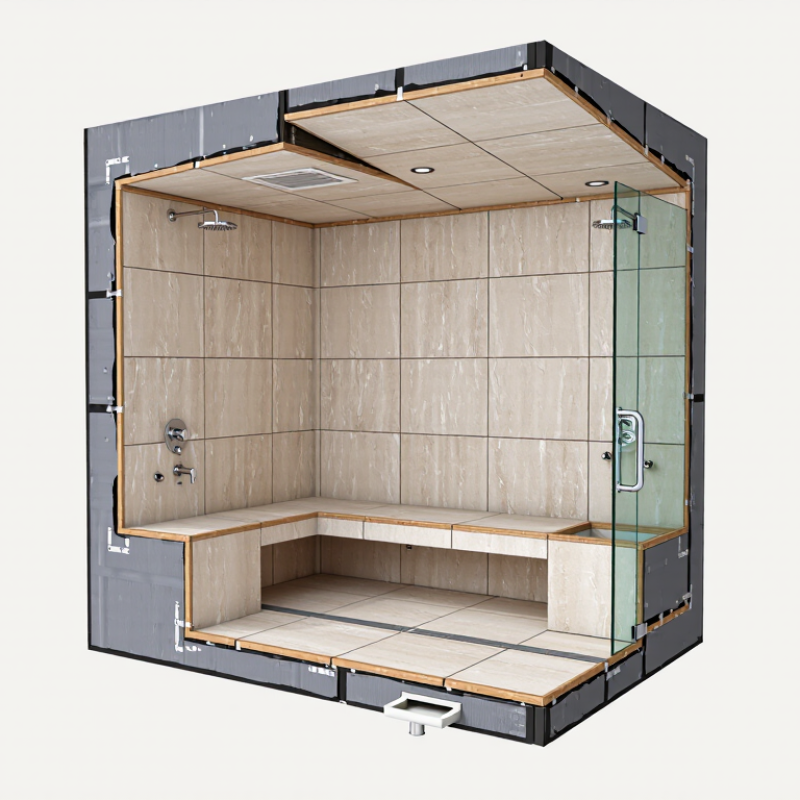
Understanding Stone Waterproofing Needs in a Steam Shower
Stone in a steam shower needs more than a surface sealer. Natural stone can absorb water vapor, especially when it has open pores, fissures, or a honed finish. A penetrating sealer may reduce staining, but it does not replace a waterproofing system.
The key protection should sit behind the stone. Use a continuous, steam-rated membrane across walls, ceilings, benches, niches, and floors. Pay close attention to corners, pipe openings, control valves, and drain connections. Small gaps can let vapor enter the assembly and condense behind the tile. The ceiling also needs proper slope, so condensed water does not drip onto the user.
Stone selection matters. Dense stone usually absorbs less moisture than softer, more porous varieties, but no stone should be treated as completely waterproof. Test a sample with water before installation. Check for darkening, uneven absorption, and possible staining. The adhesive and grout must also suit high heat and constant humidity. A qualified tile professional should verify the complete assembly, not only the stone surface.
In practice, failures often come from rushed details. The wall looked finished. The hidden seams were not. I have seen beautiful installations develop odor, discoloration, or loose tiles after repeated steam cycles. That result is frustrating, and it shows why vapor control, drainage, curing time, and regular inspection deserve equal attention. Seal the stone only after the surface has cured and dried properly, following the sealer’s technical instructions.
Choosing a Suitable Sealer for Your Type of Stone
Stone choice determines the sealer, not the other way around.
Marble and limestone have open pores and can absorb moisture quickly. Granite is usually denser, but its absorption still varies by slab. Quartzite also needs testing because some pieces behave more like marble. ASTM C97 measures absorption by percentage weight, giving installers a practical starting point. Test an offcut before applying anything.
For a steam shower, a penetrating sealer is usually safer than a surface coating.
It allows vapor movement and reduces staining without creating a fragile film. However, sealer is not waterproofing. The Tile Council of North America’s 2024 Handbook identifies steam rooms as specialized wet areas requiring continuous waterproofing and vapor management behind the stone. Choose a product rated for the stone’s absorption and the shower’s heat exposure. Follow the manufacturer’s curing time carefully. Rushing this step causes trouble.
Tips:
Place several drops of water on a clean, dry sample. Record how quickly the stone darkens. A very fast darkening suggests higher absorption. Apply two thin coats only when testing supports that choice. Leave grout joints clear if the product instructions require it. Natural Stone Institute guidance also recommends routine resealing based on use, not an automatic calendar. That matters because heavy steam exposure can shorten protection. I have seen installers over-seal dense stone, leaving cloudy patches. More product is not always better. Surface preparation remains the overlooked variable.
Preparing the Stone Surface Before Applying Waterproof Protection
Preparing stone correctly matters more than choosing a powerful sealer. Stone is not automatically waterproof. The Tile Council of North America describes shower waterproofing as a complete system, including substrate, membrane, drainage, and joints. Begin by identifying the stone. Marble, limestone, and travertine can react badly to acidic cleaners. Granite usually tolerates more, but its pores still vary.
Remove dust, grout haze, soap residue, and loose particles with a pH-neutral cleaner. Do not saturate the surface during cleaning. Trapped moisture can later cloud the finish or weaken adhesion. ASTM C97/C97M evaluates stone absorption through controlled water exposure, proving that visual inspection alone is unreliable. Test a hidden tile first. Check color change, absorption, and cleaner compatibility. Small samples prevent expensive mistakes.
The substrate must feel firm and dry. Fill cracks, stabilize hollow areas, and correct uneven edges before applying protection. A moisture meter can help, although readings differ between stone types and should not become the only decision. Experienced installers also inspect corners, penetrations, and ledges because steam concentrates there. A surface sealer cannot replace a properly installed waterproof membrane behind the stone.
Keep joints clean. Keep the slope visible. The U.S. Environmental Protection Agency recommends indoor relative humidity below 60%, ideally between 30% and 50%; steam rooms will exceed that temporarily, so ventilation and drying time remain important. I have seen rushed preparation ruin otherwise beautiful stone. The weak point is often not the product, but the assumption that “clean enough” means ready.
Maintaining and Reapplying Waterproofing Over Time
What Is the Best Way to Waterproof Stone in a Steam Shower?
Maintaining and Reapplying Waterproofing Over Time
Stone in a steam shower needs more than a fresh surface sealer. The concealed waterproofing system protects the wall assembly. Grout and stone sealers do not replace it. The 2024 Tile Council of North America Handbook recommends continuous vapor control for steam-room construction. It also references membranes tested under ASTM E96. A permeance rating of 0.5 perms or lower is commonly specified for steam applications. Check the membrane’s test documentation. Do not guess.
Inspect the shower every few months. Look for darkening stone, loose joints, cracked grout, and soft caulk at corners. Pay close attention around the bench, controls, and ceiling. These areas receive constant heat and condensation. Clean the stone gently, then allow it to dry fully before resealing. The Natural Stone Institute notes that absorption differs widely among stone types, so one schedule cannot fit every installation. A dense stone may need less frequent treatment. A porous stone may need earlier maintenance.
A simple water-drop test can guide inspection, but it is not laboratory proof. If water darkens the stone quickly, consult the sealer’s technical sheet. Reapply only when the surface is clean, dry, and compatible. A yearly schedule sounds tidy, but it can be wrong. Some sealers last several years; harsh cleaners shorten performance. If moisture persists behind the stone, stop resealing. Correcting the underlying membrane or drainage problem matters more than adding another coat. Steam is unforgiving.
What Is the Best Way to Waterproof Stone in a Steam Shower?
Maintaining and Reapplying Waterproofing Over Time
In a frequently used steam shower, stone sealer may require renewal at different intervals depending on porosity and wear. Dense granite commonly lasts longer, while marble, limestone, travertine, and slate generally need more frequent inspection. These ranges are practical maintenance estimates rather than guarantees. Test the surface periodically by placing a few drops of water on clean, dry stone; if the water darkens the stone or absorbs quickly, clean the surface and reapply a compatible penetrating sealer according to the product instructions.
Conclusion
What is the best way to waterproof stone in a steam shower? The most effective approach is to combine proper surface preparation with a penetrating sealer designed for the specific stone. Natural stone varies in porosity, so the selected product should be compatible with materials such as marble, granite, slate, or limestone and suitable for high-moisture environments. Before sealing, clean the surface thoroughly, remove soap residue and construction dust, allow the stone to dry completely, and repair any cracks or weak grout joints.
Apply the sealer evenly to walls, floors, corners, and joints according to the product instructions, paying special attention to areas where water may collect. Avoid leaving excess sealer on the surface, as it can create a cloudy or sticky finish. Waterproofing is not a one-time task: inspect the stone and grout regularly, clean them with gentle products, and reapply protection when water no longer beads on the surface. Proper ventilation and routine maintenance will also help preserve the stone and reduce moisture-related damage over time.
 Aura Stone
